In nearly every beginning violinist’s journey, there comes a particularly jarring moment of slight panic, utter dismay, and almost comical confusion. It comes when you first place the instrument on your shoulder, bring the bow up to the strings — and promptly realize just how challenging it’s going to be to learn notes on a fretless fingerboard.
Rest assured, you’re not completely on your own when it comes to finding the right notes. Finger tape for violin is an extremely common teaching tool, and you don’t need perfect pitch to apply the tape yourself.
In this post, we’ll cover different kinds of tape you can use, where and how to apply it, and how to remove it.
Table of Contents
Fingerboard Tape 101
Using fingerboard tape to train your fingers and ears relies on a very simple concept: marking the correct notes on the fingerboard to offer a visual cue as your guide.
Tapes

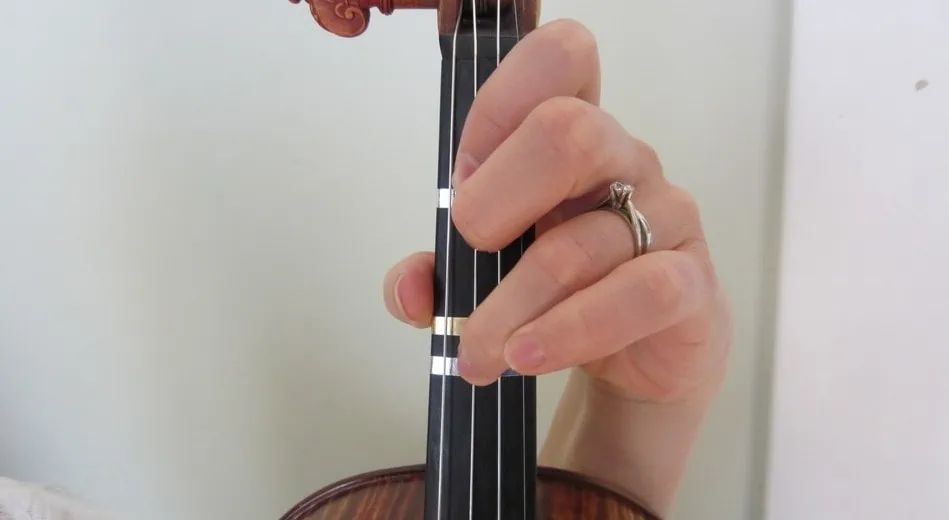
The oldest trick in the book is to use thin strips of tape to mimic the kind of frets you find on guitars.
Given that all you need to employ this method is tape, many violinists will just use an appropriate tape they already have at home.
Electrical tape, masking tape, and painter’s tape are all perfectly suitable candidates. None of them are so adhesive as to damage the fingerboard, and they are also easy to remove. (Yes, at some point, you’re going to have to remove the training wheels.)
Keep in mind that you will have to trim these kinds of tapes yourself. Recommended width for fingerboard tape is about ⅛” — any wider and you stand to defeat the purpose of using guides to achieve good pitch in the first place!
To bypass the painstaking process of slicing household tapes into itsy bitsy ⅛” strips, you can purchase tape that is made specifically for fingerboards. It’s affordable, it’s the ideal width for finger tape, and it comes in different colors which can be a tremendous help to young learners.
Application: Easy As 1, 2, 3!

Once you’ve got a handful of finger tapes that measure approximately ⅛” in width and 3“ in length, you’re ready to apply. So … how do you find the notes?
The very first step is to tune your violin. You can use either a tuning app or a proper tuning device like this. In any case, keep your tuning tool handy as you will be using it again later to perfect the placement of your finger tapes.
For someone with absolutely no musical experience, using measurements takes out a lot of the guesswork.
It is worth noting, however, that because every instrument is hand-crafted, minor variations occur from one instrument to another. Once you’ve got the strips near these very generalized measurements, you will need to fine tune the pitch before committing the tape to the fingerboard.
Here is a breakdown of basic violin finger placement measurements, broken down by the size of the instrument. Measure from the nut, and mark the appropriate measurement on the fingerboard with a pencil:
Full-size violin
- 1st finger: 35 mm
- 2nd finger: 66 mm
- 3rd finger: 80 mm
- 4th finger: 106 mm
¾ size
- 1st finger: 32 mm
- 2nd finger: 61 mm
- 3rd finger: 75 mm
- 4th finger: 100 mm
½ size
- 1st finger: 28 mm
- 2nd finger: 54 mm
- 3rd finger: 68 mm
- 4th finger: 91 mm
¼ size
- 1st finger: 25 mm
- 2nd finger: 48 mm
- 3rd finger: 60 mm
- 4th finger: 79 mm
Now that you’ve marked the general area where your tapes will go, you can begin to apply them, one by one.
Lay the violin in your lap with the tailpiece towards your body and the scroll jutting out from your body. If you’re using proper fingerboard tape, remove the backing from the strip.
Using the gap near the bridge, slide the strip in between the strings and the fingerboard all the way to your pencil marker and press it gently down across the board. Don’t apply it completely as you will want to pitch correct before adhering the strip completely. Leave the sides sticking out a bit while you do this.
Grab your handy tuning tool and check that the note is correct. If your strip runs perfectly parallel to the nut, you should only need to check one string, ideally D or A. So, if using the A string, use your tuner to ensure that your finger on the first strip is now playing B.
If the pitch is flat (left of the centerline on your tuner), adjust the strip slightly away from the nut. If the pitch is sharp (right of the centerline on your tuner), adjust the strip slightly towards the nut.
Once your pitch is perfect, go ahead and depress the strip completely onto the fingerboard and the sides of the neck. Repeat for each finger guide you desire.
To ensure proper placement, you can check each strip on each string by tuning for these notes:
1st finger: on G string = A, on D string = E, on A = B, on E = F#
2nd finger: on G = B, on D = F3, on A = C#, on E = G#
3rd finger: on G = C, on D = G, on A = D, on E = A
4th finger: same as the next open string so, on G = D, on D = A, on A = E, and on E = B
For beginning violinists who already have a background in music, feel free to skip the measurement step entirely and simply use a tuner or a well-tuned piano to find your notes.
Fantastic Finger Guide

A newer, jazzier alternative to the tried and true finger tape method detailed above is the Fantastic Finger Guide.
This clever, prefabricated decal adheres across your entire fingerboard and shows you not only where your fingers go in the first position, but where to find accidentals such as F natural on the E string and C# on the G string.
Some students find this guide a little busy, and it’s worth noting that, again, as each instrument is different, a prefab guide may not land you on the perfect pitch.
Regardless, students who are comfortable reading notes and hearing pitch may prefer this finger guide when training their hands and ears for violin.
Removal
Just as there comes that first, panicky, fretless moment in every violinist’s journey, there subsequently comes a truly sublime moment when you realize you don’t need your finger tapes anymore.
First, bask in this moment and pat yourself on the back for reaching an important milestone.
Then, proceed to peel off those unsightly little cheat guides. You shouldn’t need any extra tools or solvents to do this as the adhesive on the tape you used isn’t heavy-duty. (In fact, you’ll want to check the tuning of your strips from time to time to ensure they haven’t drifted too far.)
There may be a slightly sticky residue remaining on your fingerboard, but resist the urge to use anything wet to remove it. Indeed, a few wipes with a dry microfiber or tissue should resolve the issue.
If you must, you can use an instrument cleanser. But it’s wise to avoid using household cleaners such as alcohol, vinegar or soap as these may damage your fingerboard as well as the varnish on your violin’s body.
That’s a Wrap!
There’s no question that learning the violin is a deeply rewarding and simultaneously deeply trying experience, whether it’s an acoustic violin or a modern electric one. Ease your mind, and your practice, by applying simple fingerboard tape to get those notes just right!