Most drummers out there will admit to you that they don’t clean their drums as much as they should. It seems to be a common trend among every drummer I’ve ever asked. You get some outliers who like to keep everything in immaculate condition.
However, drum sets are so big that it becomes overwhelming to think of cleaning them constantly. So, here are some easy tips on cleaning your drums that will give you a push to go and get your kit in tip-top shape.
Table of Contents
Dust
One of the biggest problems in dirty drum kits is dust. It gets everywhere, especially when there hasn’t been a movement for a long time. This is particularly true for parts of your drum kit that aren’t very exposed such as the sides of the bass drum.
A quick solution for cleaning your kit is to get rid of all the dust that’s on it. You could do this on a surface level by taking a microfiber cloth and wiping all the surfaces. It will already bring back a bit of shine to your kit.
Dust tends to build up the longer you leave it. So, doing a quick wipe of your kit once a week will keep it from building up and dirtying the kit in the long run.
Disassembling the Kit

If you’re free of surface dust and you feel you need to do a deep clean, it’s time to disassemble your kit. The best way to clean it is to strip it down to the bare bones and get into all the tiny cracks and holes.
By doing this, you may find some inner dust that you missed beforehand. The microfiber cloth can be put to use again. Take it and rub along all the rims that are now exposed. Wherever you see metal, give it a good wipe.
If you’re a beginner drummer, you may not know how to assemble and disassemble a drum kit. In that case, just make sure you look up a few tutorials on how to do it so you don’t get lost.
Wood Chips
Little pieces of wood tend to get stuck in tight areas of the kit thanks to the constant bashing of sticks on the shells. The most common place for these wood chips to get stuck is around the surface of the heads.
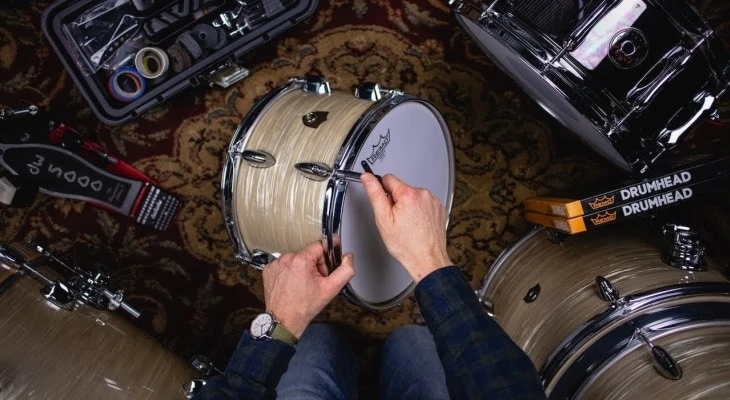
The best way to clean these up is to remove the head and then wipe them off. Once you’ve done that, you can put the head back on and tune the drum.
Polishing
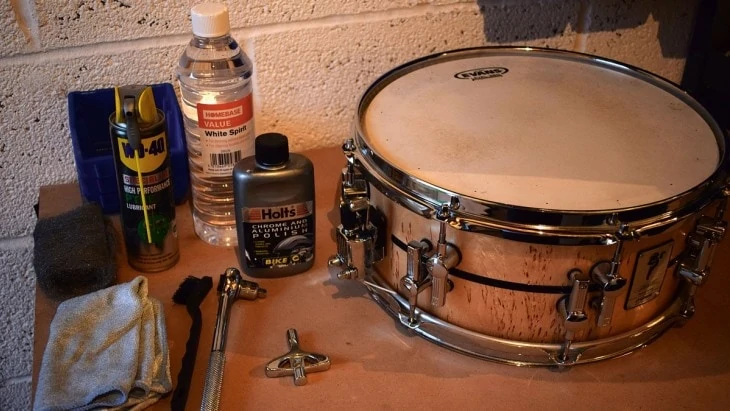
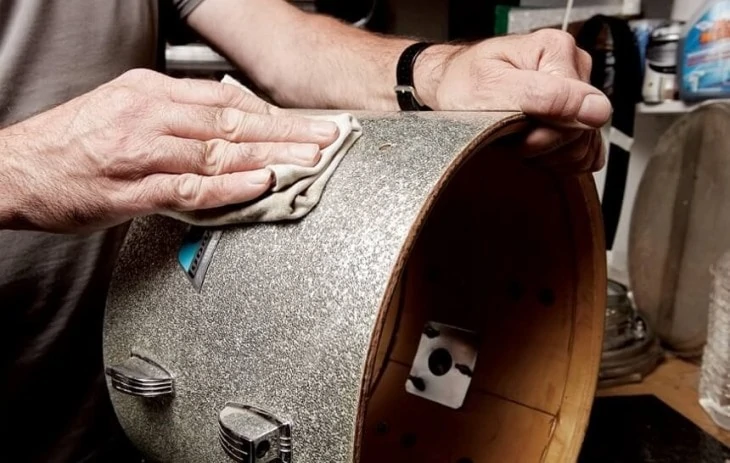
Now that all the inner parts have been dusted, you can move on to getting the drums to have more shine. The parts that need polishing are all the metals on the drum kit. This includes rims, cymbals, and hardware.
The wooden parts of drum shells need to be kept safe, so it’s a good idea to cover them up so that the polish doesn’t get to them. You could avoid that entirely by completely stripping the hardware from the shell, but that would be a huge mission. Instead, it’s easier just to cover the shells with masking tape.
Most polishes work well with hardware and rims. The cymbals, on the other hand, would be better taken care of with dedicated cymbal cleaners. These cleaners are designed to bring the shine back to bright cymbals.
Just make sure you aren’t using cymbal polish on dark and dry cymbals as they’re not meant to be shiny in the first place. Also, make sure you don’t polish over the logos as they’ll come off as you rub them.
Oiling
Now that your drum set is clean and shiny, it may be a good idea to lubricate all the moving parts. This technically doesn’t count as cleaning. However, it’s the best time to do it as your drum kit will be stripped down anyway.
The moving parts include all the cymbal stands that raise up and down as well as the tom mounting hardware. Oiling these parts will prevent them from having any issues in the future, keeping your drum set durable.
When Should You Clean Drum Sets?
You don’t need to do a deep clean of your drum set all too often. Any polishing and deep dusting should last a good while. So, once a year is a good goal to set if you want your kit in pristine condition.
Some other times to clean your set would be if it’s going to be showcased anywhere. Some drummers clean their kits before big gigs as they want it to look immaculate on the stage.
Keeping a Tidy Space
Drum sets often live in garages, outdoor rooms, or basements that don’t have too many people coming into them. This leads to the room being neglected when it comes to tidiness. The messier your room, the dirtier your drum kit is going to get over time.
So, it’s extremely important to keep a tidy space to play drums in. Not only will it prevent a lot of dust from building up, but it will also give you a clear mind that can benefit your playing.
It’s also important to keep your drums in a place where they’ll be safe. If they’re near a window, the hardware will be more prone to rusting and losing its color over time. The drums could also easily get scratched if they’re in a place that is crammed up with different things.
Conclusion
The cleaner your drum set is, the happier you’ll be as a drummer. It may seem like a mission to pull it apart and wipe everything, but it’s well worth all the effort. Besides, you only need to do that at least once a year for your kit to stay in good condition.
If you dust your kit once a week, the finish on the shells will stay looking as shiny as it did when you first bought the drum set. I’m sure everyone would love their kit to stay looking like that.
It’s important to develop cleaning habits and stick to them!
What’s the best way to clean my Roland TD-17KVX electronic drum kit?
I personally prefer to just wipe e-kits with a damp cloth, and (if needed) a tiny bit of mild liquid soap.